Holding pressure is a critical yet often misunderstood aspect of the injection molding process. As a professional plastic injection molding manufacturer, I’m here to demystify this crucial parameter and explain exactly how holding pressure impacts your molded parts.
Let’s start from the beginning – what even is holding pressure?

A Definition of Holding Pressure
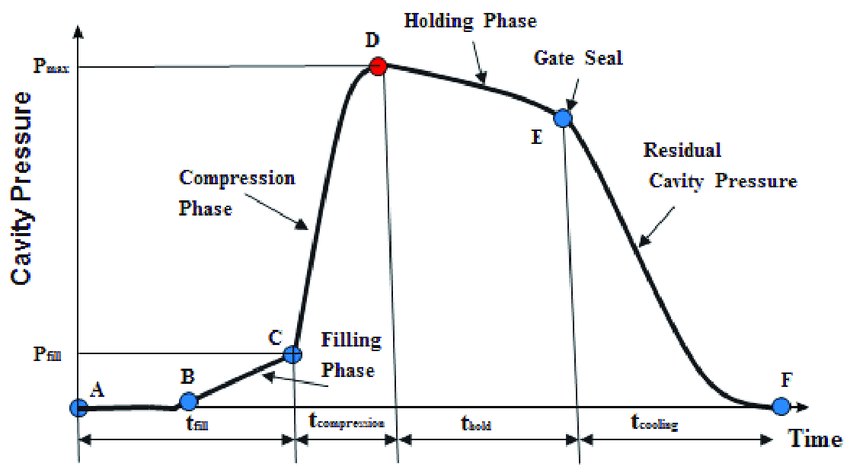
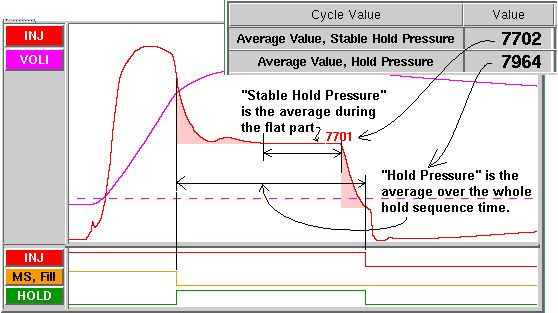
In short, holding pressure is the pressure maintained on the molten plastic after the mold cavity fills during injection molding. It typically sits around 70-80% of the maximum injection pressure.
The purpose of holding pressure is twofold:
- Compensate for material shrinkage as the part cools and solidifies
- Pack out the mold and provide adequate force for the last 5-10% of the cavity to fill
Molten plastic shrinks as it cools. Without holding pressure, this shrinkage would suck extra material from the runners and gates back into the barrel, leaving you with short shot parts.
By keeping pressure on the screw, holding pressure feeds extra material into the mold to account for this shrinkage. The result? Fully packed parts.
Now I don’t know about you, but I think some visuals are in order. Here’s what happens during the phases of injection molding:

- Phase 1 – Filling: Injection pressure fills ~95% of the mold cavity
- Phase 2 – Packing: Holding pressure packs out the last bit of the cavity
- Phase 3 – Cooling: Pressure drops as the part solidifies
The actual pressure values during holding depend on the material. For example:
- Polyamide (PA) holding pressure – 50% of injection pressure
- Polyoxymethylene (POM) holding pressure – 80% of injection pressure
- Polypropylene (PP) / Polyethylene (PE) holding pressure – 30-50% of injection pressure
But no matter the resin, holding pressure always sits below injection pressure to avoid flash and other defects.
Now that you understand the fundamentals, let’s dig into why tuning your holding pressure matters.
Why Holding Pressure Matters
In one word: quality.
Proper holding pressure eliminates parts defects like short shots, shrinkage, and internal voids. Take a look:

Meanwhile, insufficient holding pressure leads to:
- Sink marks
- Warpage
- Weld lines
- Dimensional inconsistency
And excessive holding pressure causes issues like:
- Flash
- Residual stress
- Gate blush
Yikes – no bueno.
By tuning your holding pressure to the optimum level, you can avoid all these defects and produce consistent, high-quality parts batch after batch.
Let me show you what I mean.
Tuning Holding Pressure for Part Quality
Dialing in holding pressure is more art than science. But here is a reliable process to find the sweet spot:
Step 1: Start with a baseline holding pressure around 65-75% of max injection pressure.
Step 2: Increase holding pressure incrementally with each shot. Inspect parts for visual defects between shots.
Step 3: Stop increasing holding pressure when the gate shows initial signs of blush or flash.
Step 4: Reduce holding pressure ~5% from the blush/flash point. This is your optimum holding pressure.
Ideally, you’ll end up with a process that fills the mold completely without blushing the gate or introducing residual stress.
Of course, don’t change holding pressure blindly. Pay attention to its effects on part quality at each increment:
- At too low pressure, expect short shots and sinks
- Near optimum pressure, parts should fill fully without defects
- Above optimum pressure, gate blushing and flash appear
Adjust your process accordingly.
And that wraps up this crash course on holding pressure! Let me know if you have any other injection molding topics you want me to cover. I live for this stuff!
