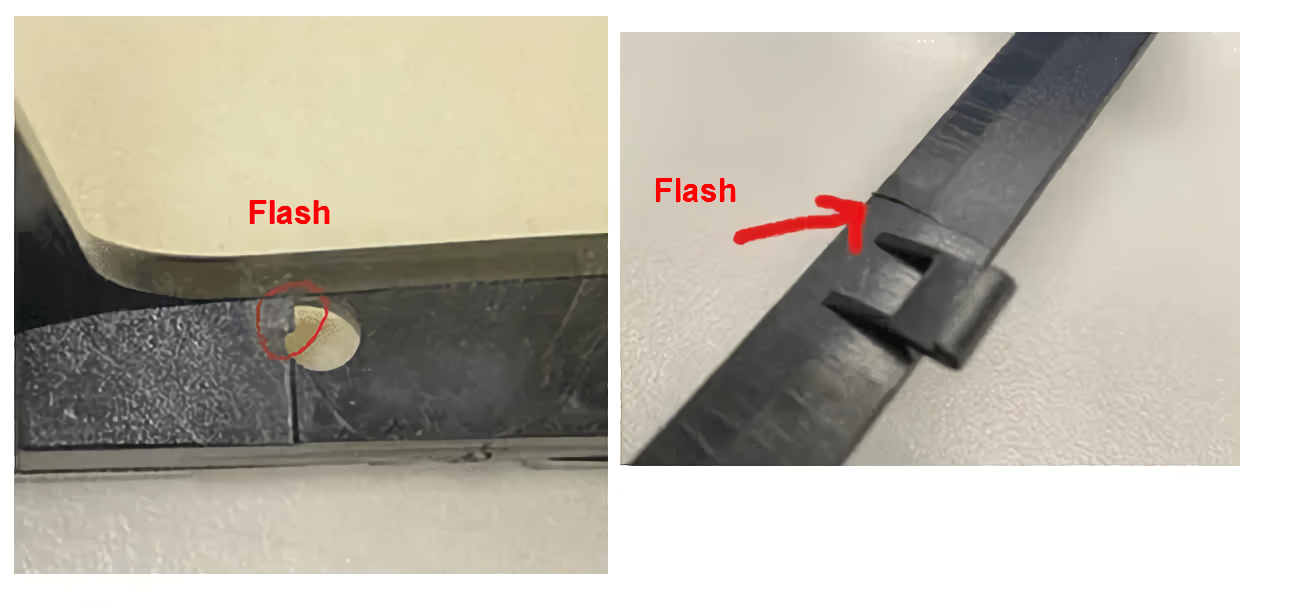
Flash is one of the most frustrating defects in injection molding. This thin layer of plastic along the parting line of your molded parts not only looks bad but can also lead to costly post-processing.
So what causes flash in the first place? And more importantly, how can you prevent it from happening?
In this complete troubleshooting guide, as a professional plastic injection molding manufacturer, I’ll walk you through the top causes of flash in injection molding. I’ll also share actionable tips to eliminate this defect from your manufacturing process.

What Is Flash in Injection Molding?
Before we get into the causes, let’s make sure we’re on the same page regarding what injection molding flash actually is.
Flash refers to a thin layer or “fin” of plastic that leaks out of the mold cavity during the injection molding process. It looks like a little flap or tab of excess plastic along the parting line of your molded component.
Sometimes you’ll also see flash around ejector pins, slides, or vents. But generally speaking, the parting line of the mold is the most common area for flash to occur.
Flash occurs when the pressure during the injection or packing phases exceeds the ability of the mold to stay fully closed. We’ll talk more about these specific causes in just a moment.
Now that you know what flash looks like, let’s uncover the root causes.
What Causes Flash in Injection Molding?
There are several potential causes of flash in injection molded parts:
- Parting line mismatches
- Improper venting
- Low clamping pressure
- Low material viscosity
- Uneven filling
- Overpacking
Next, I’ll break down each of these common causes of flashing.
Parting Line Mismatches
The parting line is where the two halves of an injection mold meet and seal together. Parting line mismatches happen when there are gaps or openings anywhere along this surface.
During injection, flashes form when molten plastic escapes through these small gaps in the parting line seals.
What leads to parting line mismatches in the first place? Here are a few common culprits:
- Contamination: Dust, dirt, oil, and residue can prevent proper sealing along the parting line.
- Worn mold: After thousands of cycles, wear and tear can distort the mold halves leading to gaps.
- Complex part geometries: Intricate part shapes apply extra pressure which can cause subtle openings.
Improper Venting
Vents allow trapped air to escape the mold cavity during injection. Without proper venting, air pressure inside the cavity can force molten plastic through any tiny gaps in the seals.
If your molds don’t have vents placed appropriately around the cavity, flashing is much more likely to occur.
Low Clamping Pressure
Clamping pressure refers to the force applied to keep the mold sealed shut during injection and packing. If the clamping pressure can’t resist the material pressure within the cavity, flash will form.
This typically happens when injection speed, pressure, or temperature is too high relative to the available clamp force.
Low Material Viscosity
Viscosity refers to the thickness and flow characteristics of the molten plastic. Lower viscosity materials flow more readily through narrow openings.
Excessive nozzle/barrel heat, moisture content, or lubricant can all contribute to drops in viscosity. And when viscosity gets too low, flash becomes much more likely.
Uneven Filling
If the mold cavity doesn’t fill evenly, you can end up with unbalanced packing pressure. Flow leaders help direct the material front, but improperly placed gates and runners also lead to uneven flow.
As pressure builds within the cavity, flashes form as the plastic escapes through any available openings.
Overpacking
Even with proper filling, problems can arise if too much material is packed into the mold. This localized overpacking induces flashes as the excess material finds ways to escape.
Gate design, runner placement, injection speed/pressure, and holding times all impact packing uniformity.
How to Prevent Flash in Injection Molding
Now that we’ve covered the major causes, let’s talk about prevention. Here are six tips to avoid flash in your injection molded components:
1. Proper mold design
Precision mold components and quality surface finishes go a long way in preventing flash. This includes appropriate vent placement, generous radius edges, and eliminating unnecessary slides, pulls, and complex shut-offs.
2. Rigorous mold maintenance
Over time, wear distortion can lead to subtle openings for flash to form. Sticking to preventative maintenance schedules helps preserve mold geometry. This includes periodic benching, polishings, inspections, and replacements when necessary.
3. Adequate clamp tonnage
Determine the required tonnage to keep mold sealed and avoid openings for flash. Oversizing presses leads to faster wear while undersizing clamps lead directly to flashing.
4. Optimized process settings
Staying within resin supplier recommendations for fill rate, injection speed/pressure, and barrel temperatures gives you a good starting point. But further tuning helps account for your specific mold and machine dynamics.
5. Dimensional stability
Choosing materials with the appropriate level of dimensional stability avoids post-ejection shrinkage which can worsen existing flash defects.
6. Dimensional tolerance
While it might seem minor, allowing a little bigger gap at the parting line enables a better seal against potential flash. Just make sure to account for these expanded tolerance bands throughout your assembly.
Eliminate Flashing and Improve Injection Molding
And there you have it – a complete guide to the causes, prevention, and fixes for injection molding flash defects.
The material science behind this process is admittedly complex. But just remember that flash ultimately comes down to the pressure inside the cavity exceeding what the mold can withstand.
Align your tooling design, machinery capabilities, process settings, and material selection to avoid these pressure imbalances. Do this, and you’ll eliminate flats while also improving quality, cycle times, and costs.
As always, I hope this guide gives you the actionable insights needed to improve your manufacturing operations. Let me know in the comments if you have any other questions!
