El moldeo por inyección de plástico es uno de los procesos de fabricación más comunes hoy en día. Desde piezas para su coche hasta dispositivos médicos y electrónica de consumo, los componentes de plástico moldeados por inyección constituyen una gran parte de los productos que utilizamos a diario.
Pero, ¿qué es exactamente el moldeo por inyección de plásticos? Y ¿cómo funciona este proceso para crear las piezas de plástico que nos rodean?
En esta completa guía, como profesional moldeo por inyección de plástico cubriremos todo lo que necesita saber:
- ¿Qué es el moldeo por inyección de plásticos?
- El proceso de moldeo por inyección paso a paso
- Los distintos tipos de moldeo por inyección
- Máquinas de moldeo por inyección de plástico
- Ventajas y desventajas
- Consideraciones sobre el diseño y limitaciones
- Defectos comunes en piezas moldeadas por inyección
Así que si quiere entender qué es exactamente el moldeo por inyección de plástico y cómo funciona, siga leyendo.
¿Qué es el moldeo por inyección de plásticos?
El moldeo por inyección de plástico es un proceso de fabricación de gran volumen en el que se inyecta plástico líquido a presiones extremadamente altas en un molde. A continuación, el plástico se enfría y se solidifica en la pieza final.
He aquí un breve resumen del proceso básico de moldeo por inyección:
- Los gránulos de plástico se introducen en la máquina de moldeo por inyección a través de una tolva
- Los gránulos avanzan gradualmente mediante un largo tornillo giratorio.
- La fricción y el calor ablandan los gránulos al empujarlos.
- Cuando los gránulos llegan al final del tornillo, son plástico fundido (aproximadamente 450oF)
- El plástico líquido se inyecta a presión intensa en un molde de acero
- Se enfría rápidamente y se solidifica al chocar con las paredes del molde
- Se abre el molde y se expulsa la pieza acabada
- A menudo son necesarias operaciones de pulido y acabado
Este proceso rápido y altamente automatizado hace que el moldeo por inyección sea extremadamente rentable para la producción de grandes volúmenes. El proceso de moldeo por inyección también ofrece una consistencia y repetibilidad extremas de una pieza a otra cuando se realiza correctamente.
El proceso de moldeo por inyección paso a paso
Veamos ahora con más detalle el proceso de moldeo por inyección. Seguiremos un componente de plástico de una silla en su viaje desde los gránulos de plástico hasta la pieza acabada.
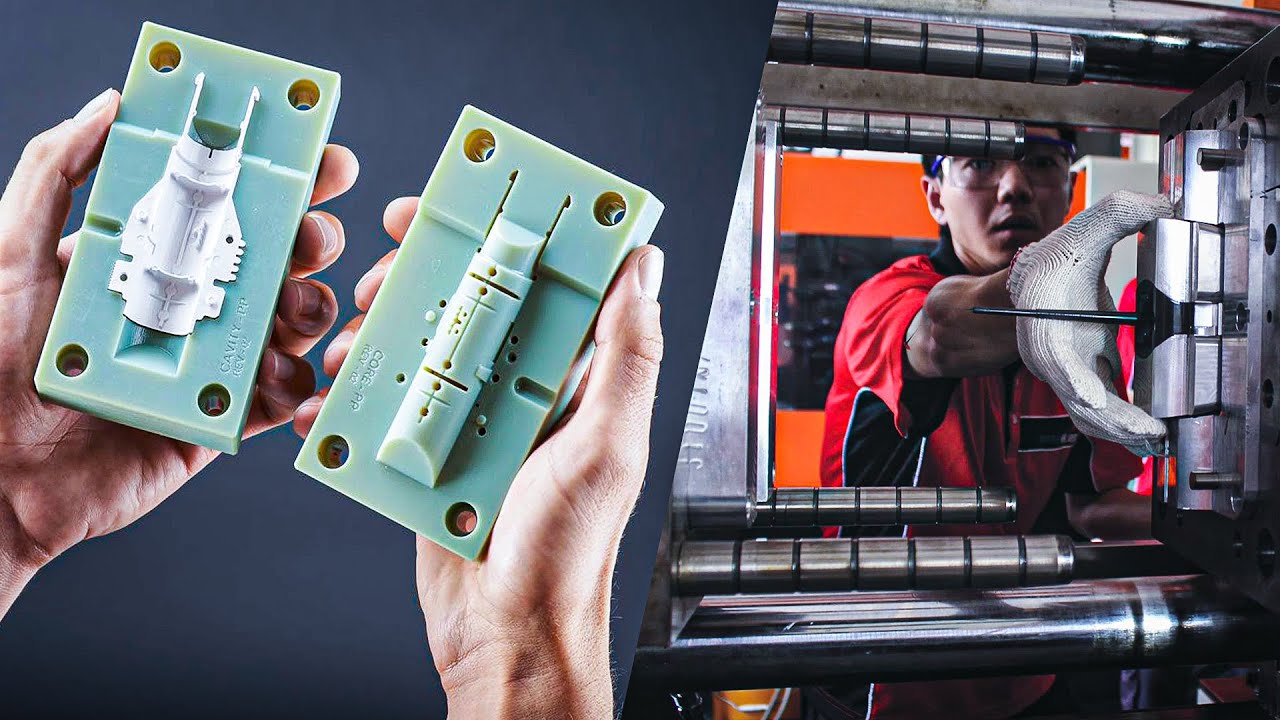
1. Sujeción
Nuestra máquina de moldeo por inyección contiene dos mitades de un molde de acero, fijadas en orientación vertical. La mitad fija se sujeta firmemente contra la mitad móvil del "núcleo".
Estas dos mitades de molde forman todas las características exteriores de nuestro componente de plástico para sillas. Permanecen herméticamente cerradas bajo presión durante todo el ciclo de inyección para evitar fugas del plástico fundido a alta presión.
Sólo hay pequeños huecos para las compuertas de inyección y los conductos de ventilación. Necesitaremos toneladas de presión para inyectar plástico líquido en la pequeña cavidad del molde.
2. La unidad de inyección
Ahora, los gránulos de plástico descienden en cascada desde una tolva superior hasta la unidad de inyección, formada por un barril calentado y un tornillo sinfín alternativo.
A medida que el tornillo gira y retrocede, los perdigones caen en el espacio vacío situado en la parte delantera del tornillo. El calor de fricción del cañón y el cizallamiento entre los perdigones provocan su reblandecimiento.
3. Carga del disparo
Los gránulos de plástico se acumulan delante del tornillo, fundiéndose aún más por el calor conducido. El volumen de granalla de plástico líquido crece...
Finalmente, el tornillo deja de girar y, en su lugar, inyecta hacia delante para suministrar la inyección. En este punto nuestro plástico está a unos 500oF y casi completamente fundido.
La carrera de inyección debe ser rápida para evitar una solidificación prematura. El volumen de inyección se planifica cuidadosamente con antelación.
4. Inyección en el molde
Cuando el plástico fundido entra en el molde a través de bebederos y canales, el aire de la cavidad sale al exterior. La presión de inyección alcanza más de 15.000 PSI.
El molde permanece firmemente sujeto para evitar que se produzcan rebabas mientras se llena la cavidad. Pasamos brevemente del control de velocidad al control de presión en el llenado volumétrico 95% para llenar el molde.
La masa fundida se enfría rápidamente al entrar en contacto con las paredes del molde a temperatura controlada. Al solidificarse, el volumen se reduce ligeramente. La presión adicional rellena más material para compensar.
5. Enfriamiento y solidificación
Ahora que está completamente lleno, la presión se mantiene durante unos segundos más mientras la compuerta se cierra. Después de esta fase de estancamiento, el tornillo de inyección libera totalmente su presión.
Nuestro componente de plástico se solidifica dentro del molde mientras los canales de refrigeración hacen circular el agua, alejando el calor. El tiempo de enfriamiento es de varios segundos como mínimo, pero suele ser de minutos en función del grosor de la pieza y del tipo de plástico.
6. Expulsión de piezas
Finalmente, las mitades del molde se separan, liberando el componente de plástico sólido de la silla para su expulsión. Los pasadores eyectores la empujan desde la superficie fija del molde. Algunos recortes menores eliminan bebederos o guías.
¡Y ya está! Nuestro componente de silla de plástico terminado se retira, listo para cualquier operación secundaria, embalaje y envío.
El molde vuelve a cerrarse rápidamente y el plástico fundido se inyecta de nuevo, reiniciando el ciclo de moldeo por inyección. La producción automatizada permite grandes volúmenes.
Los distintos tipos de moldeo por inyección
Aunque el proceso estándar de moldeo por inyección constituye la gran mayoría de la producción, algunas aplicaciones requieren técnicas modificadas:
1. Moldeo multicomponente
Producir piezas de plástico con múltiples materiales puede proporcionar grandes ventajas de rendimiento. El moldeo multicomponente combina plásticos distintos en un único proceso de inyección.
Un ejemplo común es el encapsulado de insertos metálicos dentro de un molde de plástico, lo que elimina el montaje secundario. Sin embargo, el moldeo multimaterial requiere un utillaje más complejo.
2. Moldeo por inyección asistida por gas
La inyección de gas nitrógeno a presión en la masa fundida crea canales internos huecos en las piezas moldeadas. El gas desplaza el plástico, expandiendo los espacios interiores.
La ayuda de gas es útil para reducir las marcas de hundimiento en secciones de plástico muy gruesas. También aligera considerablemente las piezas. El gas a presión rellena el plástico, lo que también mejora la resistencia.
3. Decoración en molde
La decoración en molde aplica directamente la decoración impresa a la superficie de la pieza de plástico durante el moldeo, eliminando el procesamiento secundario. Entre las técnicas más comunes se encuentran el etiquetado en molde, los revestimientos o las películas.
Dado que la decoración queda incrustada y sellada bajo una capa de plástico transparente, la decoración en molde permite obtener gráficos de superficie muy duraderos, resistentes al desgaste, al desconchado o a la descamación.
Máquinas de moldeo por inyección de plástico
Se necesita maquinaria sofisticada para las altas presiones y el control preciso del moldeo por inyección. Estos son los principales tipos de máquinas de moldeo por inyección que encontrará:
Máquinas de moldeo por inyección hidráulica
Las prensas hidráulicas han dominado desde los inicios del moldeo por inyección. El fluido hidráulico empuja un pistón para generar fuerza de cierre. Un motor de tornillo eléctrico hace girar directamente el tornillo de inyección.
Aunque son robustos y fiables, los sistemas hidráulicos son costosos debido a la ineficiencia de las bombas y los motores. También es difícil imitar un modelo totalmente eléctrico.
Máquinas de moldeo por inyección híbridas
Las máquinas híbridas utilizan fuerza hidráulica para la unidad de cierre, combinada con accionamiento eléctrico del husillo. Esto ofrece una eficiencia energética y un control de la inyección sustancialmente mejorados.
Las máquinas híbridas son un buen puente entre las máquinas hidráulicas y las eléctricas. Son más asequibles de adoptar que las máquinas eléctricas puras, al tiempo que ahorran costes operativos.
Máquinas de moldeo por inyección totalmente eléctricas
Como su nombre indica, las máquinas de moldeo por inyección totalmente eléctricas utilizan motores eléctricos para 100% de sus funciones motrices: sujeción, plastificación e inyección.
Las máquinas eléctricas permiten programar con precisión prácticamente todos los movimientos. Es posible realizar aceleraciones rápidas, cambios de dirección instantáneos y un control exacto de la temperatura de fusión del plástico.
Aunque son muy eficientes, las máquinas de moldeo por inyección totalmente eléctricas tienen unos costes iniciales mucho más elevados. El control preciso del proceso debe justificar el sobreprecio en su aplicación.
Ventajas del moldeo por inyección de plásticos
Estas son algunas de las principales ventajas que ofrece el moldeo por inyección de plástico frente a otros métodos de fabricación como Mecanizado CNC o la impresión en 3D:
Velocidades de producción extremadamente rápidas - Una vez que una máquina de moldeo por inyección está produciendo piezas, puede generar cientos o incluso miles de unidades por hora. La automatización permite producir las 24 horas del día.
Elevada relación resistencia/peso - La elección de resinas plásticas rellenas de vidrio o carbono crea piezas muy rígidas y ligeras, con una resistencia que rivaliza con la del aluminio mecanizado.
Gran precisión y consistencia de las piezas - Las máquinas de moldeo por inyección con un mantenimiento adecuado producen piezas extremadamente uniformes. Los estrictos controles del proceso producen piezas de idénticas dimensiones.
Gama de plásticos disponibles - Existen cientos de materiales plásticos, desde nylons rígidos rellenos de vidrio hasta vinilos blandos y flexibles. El moldeo por inyección se adapta a todos ellos.
Menores costes en volúmenes de producción - Aunque los moldes de inyección son muy costosos (a menudo cuestan 5 cifras), el coste incremental de la pieza es extremadamente bajo. Los costes fijos se amortizan rápidamente con el volumen de producción.
Operaciones secundarias mínimas - Las operaciones posteriores al moldeo, como taladrar o roscar orificios, resultan innecesarias. En su lugar, el molde crea todas las características necesarias.
Variedad de acabados superficiales - Desde empuñaduras texturizadas hasta instrumentos de alto brillo, la inyección en acero moldeado pulido o níquel permite obtener bellas apariencias.
Desventajas y limitaciones
Por supuesto, el moldeo por inyección tampoco es una solución de fabricación universal. He aquí algunas desventajas a tener en cuenta:
Costes de utillaje muy elevados - Como ya se ha dicho, los moldes de inyección suelen tener un precio de cinco cifras. Aumentar el volumen de producción es la única forma de absorberlo.
Geometrías limitadas - Deben evitarse las superficies socavadas y las variaciones extremas en el grosor de las paredes. Los rebajes profundos requieren núcleos plegables, lo que aumenta considerablemente el gasto en utillaje.
Las tolerancias superiores a +/- 0,005 pulgadas son difíciles - El mecanizado de piezas de plástico tras el moldeo se hace necesario para aplicaciones de precisión como cojinetes, casquillos o piezas médicas.
Ciertas limitaciones de detalle - Las nervaduras estrechas de menos de 0,015 pulgadas de grosor o los radios más estrechos de 0,010 pulgadas no se rellenarán de forma fiable. Estos detalles precisos requieren consideraciones adicionales.
Degradación molecular potencial - Los ciclos de procesamiento repetidos y el material triturado pueden disminuir las prestaciones mecánicas con el tiempo, ya que las cadenas de polímeros se acortan.
Los cambios de color requieren purga - Cambiar de resina plástica o de color exige purgar a fondo el barril para evitar la contaminación. Este tiempo de inactividad reduce la producción hasta que se estabiliza el color.
Consideraciones y normas de diseño
Una planificación cuidadosa de las piezas de plástico y los moldes de inyección desde el principio evitará problemas más adelante.
He aquí algunas directrices de diseño de mejores prácticas para permitir un moldeo por inyección eficaz:
Espesores de pared uniformes - Como ya se ha mencionado, los cambios drásticos de grosor provocan un enfriamiento desigual y una contracción problemática. Mantenga las paredes y nervaduras con un grosor no superior a 0,125 pulgadas para tiempos de ciclo cortos.
Esquinas de radio generoso - Las esquinas afiladas actúan como concentradores de tensiones, así como inhibidores del llenado. Todas las esquinas deben tener un radio de al menos 10% del grosor de la pared.
Ángulos de tiro para facilitar la expulsión - Las superficies verticales requieren un ángulo de desmoldeo mínimo de 1-2° para salir limpiamente del molde. Las corrientes de aire mayores mejoran aún más el rendimiento del molde y el alabeo de los componentes.
Evitar variaciones superiores a +/- 0,003 pulgadas - Unas dimensiones uniformes permiten el llenado completo de la cavidad. Los contornos y las paredes deben mantener la conformidad en toda la geometría de la pieza.
Minimizar los socavones - Las geometrías reentrantes requieren el colapso de los componentes principales para liberar la pieza de plástico, lo que aumenta considerablemente el coste de las herramientas.
Localice las compuertas para un llenado más fácil - La ubicación de las compuertas influye enormemente en los patrones de llenado. La colocación de las compuertas en el elemento más grueso permite una velocidad de inyección más rápida sin congelación prematura.
Defectos comunes en piezas moldeadas por inyección
A pesar de todos los esfuerzos, los componentes moldeados por inyección presentan con frecuencia pequeños defectos. He aquí algunos de los más comunes:
Flash - Exceso de material que se escapa a lo largo de la línea de partición del molde antes de una sujeción adecuada. Los destellos indican un tonelaje insuficiente o problemas de alineación.
Marcas de fregadero - Depresiones localizadas debidas a la contracción por enfriamiento en las secciones de plástico más gruesas. Los hundimientos aparecen cuando el volumen del material se reduce al aumentar la densidad.
Alabeo - Distorsión por torsión causada por una contracción desigual en la geometría de la pieza moldeada por inyección durante el enfriamiento. el grosor no uniforme de la pared es un factor clave.
Líneas de soldadura - Marca testigo visible a lo largo de los frentes de flujo de fusión de dos puntos de inyección. Las líneas de soldadura difieren en apariencia de las zonas circundantes, pero rara vez afectan al rendimiento.
Chorro - Ondas visibles del frente de flujo causadas por velocidades de inyección más altas. El chorro se produce cuando el material fluye en un espacio vacío repentino dentro del molde.
Marcas de quemaduras - Puntos descoloridos o carbonizados por plástico excesivamente caliente. La descomposición sugiere temperaturas de barril demasiado altas para una resina determinada.
Disparo corto - Llenado incompleto del molde. Las piezas con disparos cortos exponen la línea de soldadura e indican una presión de llenado de inyección o una fuerza de cierre inadecuadas.
Un diseño cuidadoso del molde y de los componentes minimiza estos defectos. Pero cuando inevitablemente surgen problemas, la modificación de las presiones de inyección, las tasas de llenado y las temperaturas del molde pueden corregir muchos problemas.
Conclusión
El moldeo por inyección de plásticos ofrece una eficacia de fabricación inigualable para volúmenes de producción extremadamente altos. Permite la fabricación rápida y rentable de componentes de plástico con un estricto control dimensional a lo largo de millones de ciclos.
Aunque no es adecuado para series cortas, el moldeo por inyección ofrece precisión y economía a gran escala. Solo tiene que tener en cuenta las limitaciones de su diseño y las piezas moldeadas por inyección se adaptarán perfectamente a su aplicación.
El proceso de moldeo por inyección utiliza maquinaria especializada para fundir e inyectar termoplásticos en un molde de acero a alta presión. Este proceso automatizado y continuo produce piezas de plástico con una gran precisión dimensional en grandes cantidades de producción.
Esperamos que esta guía le haya ayudado a comprender qué es exactamente el moldeo por inyección de plástico y cómo se ha convertido en una tecnología de fabricación esencial en todo el mundo. Hágame saber si tiene alguna otra pregunta sobre el moldeo por inyección que pueda responder.