
Vous voulez savoir comment fabriquer un bouchon en plastique?
Il s'agit d'une industrie de grande envergure. Des millions de bouchons en plastique sont fabriqués chaque jour dans le monde entier.
Et voici ce qu'il en est :
Le processus est plus complexe que la plupart des gens ne le pensent. Mais une fois que l'on a compris les principes fondamentaux, tout s'explique.
Dans ce guide, en tant que professionnel de la personnalisation fabricant de bouchons en plastiqueDans cet article, je vous explique tout ce que vous devez savoir sur la fabrication des bouchons en plastique. Depuis les matériaux et les méthodes jusqu'au contrôle de la qualité et aux finitions.
Plongeons dans le vif du sujet.
Ce que vous apprendrez dans ce guide
Avant d'entrer dans le vif du sujet, voici ce que je vais aborder :
- Les deux principales méthodes de fabrication (moulage par injection et moulage par compression)
- Quels sont les plastiques les plus adaptés aux bouchons de bouteilles ?
- Processus de fabrication étape par étape
- Les éléments essentiels du contrôle de la qualité
- Considérations relatives aux coûts
- Solutions de bricolage pour la production à petite échelle
Cela vous convient-il ? Commençons par les bases.
Les deux principales méthodes de fabrication des bouchons en plastique
Les fabricants utilisent deux méthodes principales pour fabriquer les bouchons de bouteilles en plastique :
- Moulage par injection
- Moulage par compression
La plupart des installations modernes utilisent le moulage par injection. Pourquoi ? C'est plus rapide, plus précis et parfait pour la production en grande quantité.
Mais le moulage par compression a toujours sa place, en particulier pour des types de bouchons spécifiques.
Permettez-moi de détailler chaque méthode.
Moulage par injection : La norme industrielle
Le moulage par injection domine l'industrie des bouchons en plastique. Et pour cause.
Voici comment cela fonctionne :
Tout d'abord, les granulés de plastique sont chauffés dans un tonneau jusqu'à ce qu'ils fondent. Ensuite, ce plastique fondu est injecté dans la cavité d'un moule sous une pression extrême.
La forme du moule détermine la conception finale du bouchon. Refroidissez le moule et vous obtiendrez un bouchon fini.
L'ensemble du processus se déroule en quelques secondes. C'est pourquoi les fabricants peuvent produire des milliers de bouchons par heure.
Mais voici ce qui fait la spécificité du moulage par injection :
Précision. Vous pouvez créer des dessins de fils complexes et des caractéristiques d'inviolabilité avec une précision incroyable.
Répétabilité. Chaque bouchon est pratiquement identique. Aucune variation de dimension, de forme ou de finition.
Rentabilité. Une fois que vous avez investi dans les moules, le coût unitaire diminue considérablement.
Le moulage par compression : L'approche alternative
Le moulage par compression fonctionne différemment.
Au lieu d'injecter du plastique en fusion, vous placez une quantité prémesurée de matériau directement dans un moule ouvert. Vous appliquez ensuite de la chaleur et de la pression pour former le bouchon.
Cette méthode fonctionne très bien pour :
- Plastiques thermodurcissables
- Capuchons avec des exigences uniques en matière de matériaux
- Production en petites séries
L'inconvénient ? Elle est plus lente que le moulage par injection. Et il peut être difficile d'obtenir une qualité de fil constante.
Sélection des matériaux : Choisir le bon plastique
Tous les plastiques ne sont pas égaux. Surtout lorsqu'il s'agit de bouchons de bouteilles.
Les matériaux les plus courants sont les suivants
PEHD (polyéthylène haute densité)
Le PEHD est le cheval de bataille de l'industrie des bouchons. On le trouve sur les bidons de lait, les bouteilles de détergent et d'innombrables autres récipients.
Pourquoi le PEHD a du succès :
- Excellente résistance chimique
- Durable et résistant aux chocs
- Entièrement recyclable
- Rentabilité
Le seul inconvénient ? Les bouchons en PEHD peuvent être trop souples pour certaines applications.
Polypropylène (PP)
Le PP va encore plus loin. Il est plus dur que le PEHD, ce qui le rend parfait pour les bouchons qui nécessitent une durabilité accrue.
Vous verrez les capuchons du PP :
- Bouteilles de soda
- Conteneurs à médicaments
- Emballage alimentaire
Astuce : le PP est particulièrement efficace lorsque vous avez besoin de bouchons qui résistent à des ouvertures et fermetures répétées.
LDPE (polyéthylène basse densité)
Le PEBD apporte de la flexibilité. Il est plus souple que le PEHD et le PP.
Il est donc idéal pour :
- Presser les bouchons de bouteilles
- Bouchons de distribution
- Capuchons qui doivent être flexibles sans se casser
PET (polyéthylène téréphtalate)
Le PET n'est pas aussi courant pour les bouchons, mais il a sa place. Il est clair comme de l'eau de roche et incroyablement résistant.
Parfait pour :
- Emballage haut de gamme
- Des casquettes où l'apparence compte
- Applications nécessitant de la transparence
Comment fabriquer un bouchon en plastique : Processus étape par étape
Voyons maintenant comment les bouchons en plastique sont fabriqués par moulage par injection.
Étape 1 : Préparation du matériel
Tout commence par des granulés de plastique. Ces minuscules billes de plastique arrivent à l'usine dans des sacs ou des conteneurs massifs.
Mais voilà :
Les granulés doivent être absolument secs. Même une infime quantité d'humidité peut gâcher le produit final.
Les fabricants utilisent des séchoirs spécialisés pour éliminer toute trace d'eau. Ce processus peut durer de 2 à 4 heures en fonction du matériau.
Étape 2 : Fusion et injection
Ensuite, les granulés séchés entrent dans la trémie de la machine de moulage par injection.
Une vis rotative les pousse vers l'avant tandis que des éléments chauffants font fondre le plastique. La température varie en fonction du matériau :
- HDPE : 180-220°C
- PP : 200-250°C
- LDPE : 160-200°C
Une fois fondu, le plastique est injecté dans le moule sous des pressions atteignant 20 000 PSI.
Il s'agit d'une pression importante. Elle permet de s'assurer que le plastique remplit chaque petit détail du moule, y compris les pas de vis cruciaux.
Étape 3 : Refroidissement et solidification
C'est là que la patience porte ses fruits.
Le moule contient des canaux de refroidissement remplis d'eau ou d'huile. Ces canaux maintiennent des températures précises pendant que le plastique se solidifie.
Le temps de refroidissement dépend de :
- Epaisseur du bouchon
- Type de matériau
- Température du moule
Les temps de refroidissement typiques sont compris entre 10 et 30 secondes.
Étape 4 : Éjection et finition
Une fois refroidi, le moule s'ouvre et des broches d'éjection poussent les bouchons finis.
Mais nous ne sommes pas encore au bout de nos peines.
De nombreux capuchons tombent du moule encore reliés aux canaux (les canaux qui ont acheminé le plastique fondu). Ceux-ci doivent être coupés.
Certains bouchons nécessitent également une finition supplémentaire :
- Impression ou gaufrage
- Insertion de la doublure
- Assemblage de fermetures en plusieurs parties
Conception du fil : Le secret d'une étanchéité parfaite
Voici une chose dont la plupart des gens ne se rendent pas compte :
La conception du filetage fait le succès ou l'échec d'un bouchon de bouteille.
Les filetages doivent correspondre parfaitement entre le bouchon et le goulot de la bouteille. Trop lâche ? Votre produit fuit. Trop serré ? Les consommateurs ne peuvent pas l'ouvrir.
Les spécifications des filets sont conformes aux normes ASTM D2911. Cela inclut :
- Pas du filet (distance entre les filets)
- Profondeur du fil
- Nombre de départs de fils
- Angle du profil du filet
La plupart des bouchons de bouteilles sont à filetage continu (CT). La désignation ressemble à ceci : "28-410"
Où ?
- 28 = diamètre du col en millimètres
- 410 = configuration du fil
Pour y parvenir, il faut un outillage de précision et une conception minutieuse des moules.
Contrôle de la qualité : S'assurer que chaque bouchon répond aux normes
Le contrôle de la qualité dans la fabrication des bouchons n'est pas facultatif. Il est essentiel.
Voici ce que les fabricants vérifient :
Précision dimensionnelle
Chaque mesure est importante. Les équipes chargées de la qualité utilisent des instruments de précision pour vérifier :
- Diamètre total
- Hauteur
- Dimensions du filet
- Epaisseur de la paroi
Des variations, même minimes, peuvent entraîner des problèmes ultérieurs.
Test d'étanchéité
Personne ne veut d'une bouteille qui fuit. C'est pourquoi les bouchons sont soumis à des tests d'étanchéité rigoureux.
Les méthodes les plus courantes sont les suivantes :
- Essais sous pression
- Essais sous vide
- Tests de pénétration des colorants
Essais de matériaux
Les fabricants testent régulièrement les propriétés des matériaux :
- Résistance à la traction
- Résistance aux chocs
- Compatibilité chimique
- Résistance aux UV
Inspection visuelle
Les systèmes de vision automatisés vérifient :
- Cohérence des couleurs
- Défauts de surface
- Contamination
- Formation adéquate
Conception de moules : Quand l'ingénierie rencontre l'art
C'est dans le moule que la magie opère. La conception d'un moule exige de sérieux talents d'ingénieur.
Les moules à casquette modernes présentent les caractéristiques suivantes
- Cavités multiples (8-96 capsules par cycle)
- Conception de noyaux spécialisés pour les fils
- Systèmes à canaux chauds pour plus d'efficacité
- Canaux de refroidissement précis
C'est là que le bât blesse :
Un seul moule peut coûter de $50 000 à $500 000. Mais il produira des millions de bouchons au cours de sa durée de vie.
Pour les bouchons filetés, la conception du moule devient encore plus complexe. Certains bouchons se détachent simplement du noyau. D'autres nécessitent des mécanismes de dévissage qui font pivoter le bouchon hors du filetage.
Considérations sur les coûts
Parlons argent.
Le coût de fabrication des bouchons en plastique dépend de plusieurs facteurs :
Coûts des matériaux: Les granulés de plastique brut coûtent généralement de $0,50 à $2,00 la livre. Une livre peut produire de 100 à 500 bouchons en fonction de la taille.
Investissement dans les moules: Comme nous l'avons mentionné, les moules sont coûteux. Mais si l'on répartit ce coût sur des millions de capsules, il devient gérable.
Temps machine: Les machines de moulage par injection coûtent entre $50 et $500 par heure.
Travail: Les installations modernes sont hautement automatisées, ce qui permet de maintenir les coûts de main-d'œuvre à un niveau peu élevé.
Volume: C'est le plus important. Les volumes élevés réduisent considérablement les coûts unitaires.
Le résultat ? À grande échelle, la production de bouchons en plastique peut ne coûter que quelques centimes.
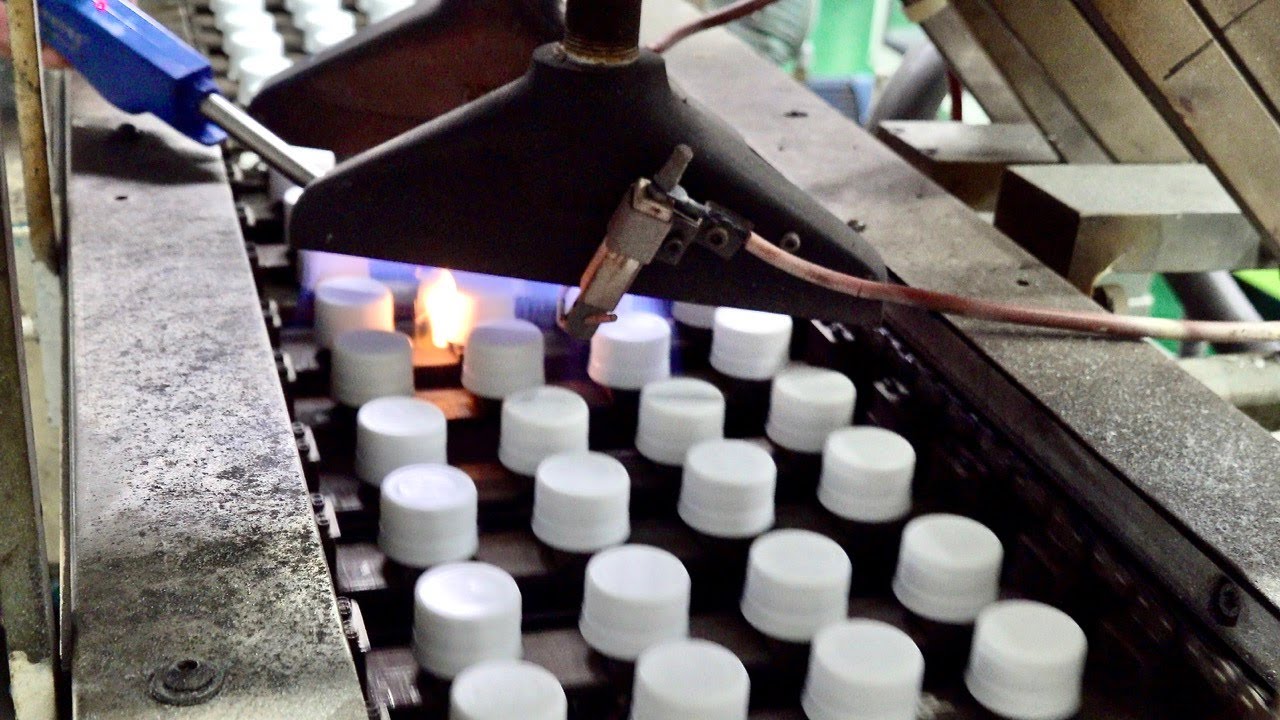
Gaufrage et personnalisation
Vous voulez que votre marque figure sur toutes les casquettes ? Le gaufrage permet d'y parvenir.
La beauté du moulage par injection ? Vous pouvez ajouter des détails incroyables directement dans le moule. Aucune opération secondaire n'est nécessaire.
Les gaufrages les plus courants sont les suivants :
- Logos d'entreprise
- Instructions d'ouverture
- Symboles de recyclage
- Codes de date
Conseil de pro : les éléments gaufrés sont éternels. Contrairement aux étiquettes imprimées qui s'effacent, le gaufrage est permanent.
Considérations environnementales
L'industrie s'efforce d'améliorer ce point :
Durabilité.
La plupart des bouchons en plastique sont recyclables. Mais ils utilisent souvent des plastiques différents de ceux des bouteilles qu'ils ferment. Cela complique le recyclage.
La solution ? Concevoir pour le recyclage dès le départ :
- Utiliser des matériaux compatibles
- Fabriquer des bouchons qui restent attachés après ouverture
- Marquer clairement les codes de recyclage
- Minimiser l'utilisation des matériaux
Certains fabricants utilisent désormais des plastiques recyclés dans leurs bouchons. Il s'agit d'une tendance croissante qui permet de boucler la boucle.
Bricolage et alternatives à petite échelle
Et si vous n'avez besoin que de quelques bouchons ? Le moulage par injection industriel n'a pas de sens.
Voici quelques alternatives :
Impression 3D: Idéal pour les prototypes et les petites séries. Les imprimantes modernes peuvent créer des bouchons fonctionnels avec une qualité de fil décente.
Moulage en silicone: Créez vos propres moules et coulez des bouchons à l'aide de résines bi-composantes.
Capsules existantes modifiées: La solution la plus simple consiste parfois à adapter à vos besoins des bouchons disponibles dans le commerce.
Par exemple, j'ai vu des fabricants percer des trous dans des bouchons standard et ajouter des joints en silicone pour des applications spécialisées. Ce n'est pas très joli, mais cela fonctionne.
Techniques de fabrication avancées
Le secteur ne cesse d'évoluer. Voici quelques développements de pointe :
Moulage multi-matériaux: Combinaison de plastiques durs et souples dans un seul bouchon.
Étiquetage dans le moule: Ajout d'étiquettes pendant le processus de moulage.
Casquettes intelligentes: Intégrer RFID des puces ou des capteurs directement dans les bouchons.
Plastiques biosourcés: Utilisation de matériaux renouvelables au lieu de plastiques à base de pétrole.
Défis communs et solutions
La fabrication de bouchons en plastique ne se fait pas toujours sans heurts. Voici les problèmes les plus courants et les solutions à y apporter :
Marques d'évier: Causé par un refroidissement inégal. Solution : Optimiser les canaux de refroidissement et les temps de cycle.
Coups courts: Lorsque le plastique ne remplit pas complètement le moule. Solution : Augmenter la pression ou la température d'injection.
Flash: Excès de plastique au niveau des joints du moule. Solution : Veiller au bon alignement du moule et à la pression de serrage.
Déformation: Casquettes qui ne sont pas plates. Solution : Équilibrer le refroidissement et réduire les contraintes internes.
L'avenir de la fabrication de capsules
Quelle est l'orientation du secteur ?
Automatisation: Les robots s'occupent de tout, de l'alimentation en matériaux à l'inspection de la qualité.
Durabilité: Plus de contenu recyclé et d'options biodégradables.
Personnalisation: La production en petites séries devient plus économique.
Intégration: Capuchons dotés de fonctionnalités intégrées telles que l'inviolabilité et la protection des enfants.
Principaux enseignements
Terminons ce chapitre.
Comment fabriquer un bouchon en plastique dépend de vos besoins :
- Pour la production de grands volumes, le moulage par injection est roi
- La sélection des matériaux est importante - choisissez en fonction de votre application
- La conception des filetages nécessite une ingénierie de précision
- Le contrôle de la qualité n'est pas négociable
- Les coûts diminuent considérablement avec le volume
Que vous souhaitiez fabriquer des millions de bouchons ou simplement comprendre le processus, ces principes fondamentaux s'appliquent.
L'industrie des bouchons en plastique peut sembler simple à première vue. Mais en y plongeant, vous découvrirez un monde d'excellence technique et d'innovation permanente.
Ce petit bouchon sur votre bouteille d'eau ? Il représente des décennies d'évolution et d'expertise en matière de fabrication.
C'est plutôt cool quand on y pense.