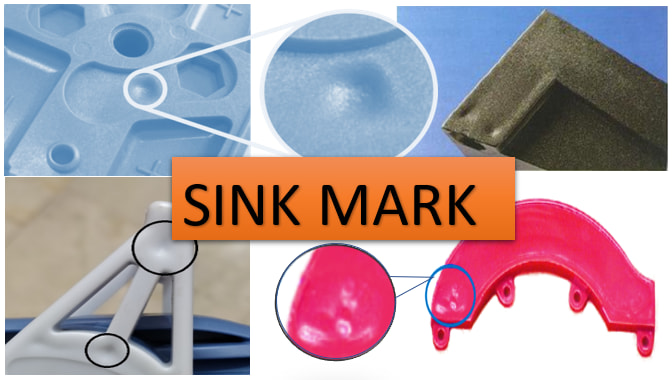
Sink marks are a common injection molding defect that leads to uneven surfaces and poor aesthetics. As a professional plastic injection molding manufacturer, I’ve worked with manufacturers who’ve struggled with sinks. By optimizing materials selection, process parameters, tooling design, and part geometry, you can avoid sinks altogether.

What Causes Sink Marks in Injection Molding?
Before diving into solutions, it’s important to review what causes sink marks in the first place. How to avoid sink mark in injection molding? Sinks occur when thick sections cool at a slower rate than thin sections. As the hot plastic in thicker regions contracts, it pulls away from the rigid outer layer in contact with the mold surface. This contraction forms a visible depression on the part exterior, known as a sink mark.
Several factors contribute to differential cooling and sink formation:
Insufficient Packing Pressure
Without enough packing pressure, the hot plastic can’t fully pack out thick features. The material shrinks as it cools, rather than remaining pushed up against the mold. Boosting packing pressure drives more resin into thick sections to prevent voids.
Low Melt Temperatures
If the plastic melt temp is too low, thick regions will resist flow and have more difficulty filling. Cranking up the temperature improves flow so all areas can pack out. Of course, temps shouldn’t exceed or even approach degradation limits.
Thick Geometry
Naturally, thicker sections cool more slowly as they retain heat longer than thin walls. By optimizing part design, you can eliminate drastic thickness changes and promote even solidification.
Poor Venting
Trapped air causes uneven filling as the material moves around pockets instead of fully packing sections. Efficient venting gives air a place to go so resin can fill entirely.
Gate Location/Size Issues
An improperly placed gate restricts flow to far reaches of the cavity. Small gates also limit material flow, potentially leaving thick areas partially packed.
How to Prevent Sink Marks When Injection Molding
Now that we understand what causes sink marks, let’s explore proven ways to avoid them through changes in materials, process settings, tooling, and part geometry.
Choose Low-Shrinkage Materials
How to avoid sink mark in injection molding? Start by selecting a plastic resin with minimal shrinkage properties. Amorphous resins like ABS, PMMA, and SAN shrink 50-60% less than semi-crystalline materials. Where strength permits, amorphous plastics help avoid sinks from the get-go. Beyond resin type, glass-filled materials shrink far less than unfilled varieties.
Optimize Process Settings
During molding, adjusting key parameters steers the process away from sinks:
- Temperature: Verify barrel and mold temps are within guidelines for the resin. Raise barrel temp to improve flow into thick sections. Lower mold temp to quicken cooling.
- Pressure: Increase packing pressure to force additional material into heavy sections, compensating for shrinkage. Extend pack time to allow thorough packing.
- Cooling: Lengthen cooling intervals before ejection to prevent early removal while inner sections remain hot.
Improve Tooling Design
Subtle modifications to tooling components significantly impact sink formation:
- Venting: Add vents to ensure air has somewhere to go as material flows in. Avoid trapped air and uneven filling.
- Cooling Lines: Extra cooling near expected sink regions pulls heat away to prevent material staying hot. Promotes even cooling.
- Gates: Redirect gates to thicker areas so flow is direct. May require adding gates to multi-gate part.
Optimize Part Geometry
Finally, tweak part design to minimize sinks:
How to avoid sink mark in injection molding?
- Eliminate drastic thickness changes and variations. Keep walls approximately equal thickness.
- Add thickness gradually with drafted angles rather than sharp corners/projections.
- Size down thick features like ribs and gussets. Make no thicker than 50-60% of wall.
- Core out heavy sections to remove mass and prevent extensive shrinkage.
Conclusion
Left unchecked, sink marks detract from part appearance and performance. By considering the root causes, we can attack injection molding sinks through smart material selection, optimized process settings, improved tooling, and part redesign. Attention early in the design stage is ideal to avoid the headaches of tweaking parts and molds after the fact. With some diligence on these fronts, you can eliminate sink defects from the equation.
How to avoid sink mark in injection molding? Careful control of materials, molding parameters, tooling factors, and geometry stops sinks in their tracks to yield defect-free, resilient end products. What strategies have you used to successfully combat sink marks? I welcome your input below!
