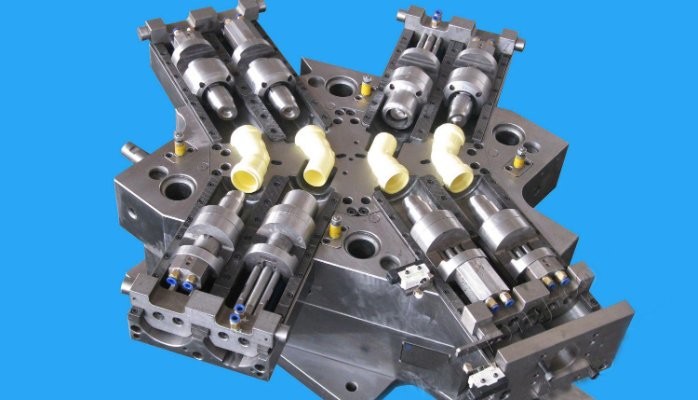
Creating a custom PVC injection mold may seem intimidating. But when broken down into simple steps, the process is very manageable.
In this comprehensive guide, as a PVC injection molding manufacturer, you’ll learn how to design and produce a PVC injection mold from start to finish. Specifically, we’ll cover:
- PVC Material Overview
- PVC Injection Molding Applications
- Design Considerations
- Prototyping the Part
- Creating the Mold Tooling
- The Injection Molding Process
- Finishing Touches
Let’s start with some background on PVC itself.

What is PVC?
PVC, or polyvinyl chloride, is one of the most versatile thermoplastics available. Here are a few things you should know about PVC:
Cost-Effective – Compared to specialty plastics, PVC pellets and raw material are inexpensive. This helps lower overall manufacturing costs.
Customizable – PVC can be mixed with plasticizers, stabilizers, and fillers to achieve specific material properties. This makes PVC customizable for many applications.
Durable – Thanks to its high tensile and impact strength, molded PVC parts can withstand years of use.
Now let’s look at some common applications for custom PVC injection molds.
PVC Injection Molding Use Cases
Some of the most popular uses for PVC injection molds include:
- Pipes – From plumbing to construction, pipes made of PVC are a fixture in infrastructure projects.
- Medical Equipment – Everything from IV bags to oxygen masks utilize molded PVC parts.
- Consumer Goods – The material is a staple in products like toys, tool handles, and storage containers.
Essentially, if an application calls for an affordable plastic that’s chemical and moisture resistant, PVC injection molding is an option worth considering.
Next, let’s go over some design tips.
Designing Parts for PVC Injection Molding
The first step is CAD modeling your part drawings. This digital prototype will then be used to create the mold tooling.
When designing parts intended for PVC injection molding, keep these guidelines in mind:
Add Draft Angles – Include a slight taper or angle on all vertical surfaces to ensure the part can release cleanly from the mold tool after cooling.
Avoid Variations in Wall Thickness – Consistent wall thickness enables even cooling. This prevents defects like warpage and sink marks.
Include Generous Radii – Sharp corners concentrate stress. Replace inner/outer corners with large radii whenever possible.
Minimize Overall Size – Larger parts shrink more unevenly. Design your PVC parts to be as compact as possible.
Adhering to these basic design rules will ensure your custom PVC mold produces top-quality parts batch after batch.
Now let’s look at the prototyping stage.
Prototype Your PVC Part Before Molding
With your 3D CAD model complete, it’s tempting to jump right into CNC machining an aluminum mold tool. But that would be a mistake.
Before investing $5,000+ into a metal mold, first validate your design with a 3D printed prototype. Here’s the process:
Step 1 – Export your CAD file to an STL and upload it to a reputable 3D printing service provider. Select a durable material like Nylon or ABS plastic.
Step 2 – Inspect your 3D printed part once received. Check for critical features like dimensional accuracy and surface finish.
Step 3 – Make any necessary design tweaks based on hands-on examination of the prototype.
This validation process only costs a few hundred dollars at most. But it ensures your expensive metal injection mold will produce accurate parts out of the gate.
Time to fabricate the mold tooling!
Create the Injection Mold Tool
With a nailed-down part design in place, it’s time to machine the mold tooling components. This includes:
- Cavity Block – The custom machined mold inserts
- Core/Ejection System – Pins and components that eject the cooled part
- Sprue/Runner System – Channels that deliver molten plastic to cavities
CNC machining is typically utilized to fabricate mold components from tool steel or aluminum. This is a complex process best left to seasoned mold makers.
Expect lead times of 4-6 weeks and per unit costs ranging from $3,000 up to $100,000+ on average. Yes, injection molds require major capital expenditure. But remember – the tool should reliably output thousands if not millions of replicas over years of production cycles.
Okay, so you have your machined mold components in hand. Let’s walk through running the injection process using PVC resin pellets.
Running the Injection Molding Production
Below is the basic workflow to go from PVC pellets to cooled, finished parts:
Step 1) Clamp/Close Mold Tool – Multi-ton hydraulic presses are used to firmly secure the core and cavity sides together.
Step 2) Heat Barrel/Inject PVC – Friction melts pellets which a screw feeds into mold cavities at high pressure.
Step 3) Cool Mold Tool – Cooling channels cut into the tool rapidly solidify the PVC in seconds.
Step 4) Open/Eject Part – Hydraulics separate mold halves so pins can push out solid plastic pieces.
The entire cycle repeats many times per hour, spitting out parts at a rapid rate. Definitely take precautions when operating industrial-grade injection molding equipment!
Post-Processing and Finishing
Freshly molded PVC parts will have excess plastic flash around their edges. Trim this away with a razor blade, sandpaper, or belt sander.
Parts can then be sonically welded into sub-assemblies or painted/silkscreened for enhanced aesthetics as needed. With properly designed mold tooling, decorative hot stamping is also possible.
Some light assembly work may also be required to transform bundles of PVC components into finished products ready for packaging and shipping.
Conclusion
And there you have it! With CAD mastery, prototyping, custom mold fabrication, plastic injection expertise, and post-processing know-how in hand, you’re now prepared to create production-grade PVC injection mold tools in short order.
Sure there are details we didn’t cover, but this guide hits all the key phases from start to finish. Hopefully these tips give you confidence to pursue your own PVC injection molding projects.
Let me know in the comments if you have any other questions. I may just write up some follow-up content if there’s enough interest!
