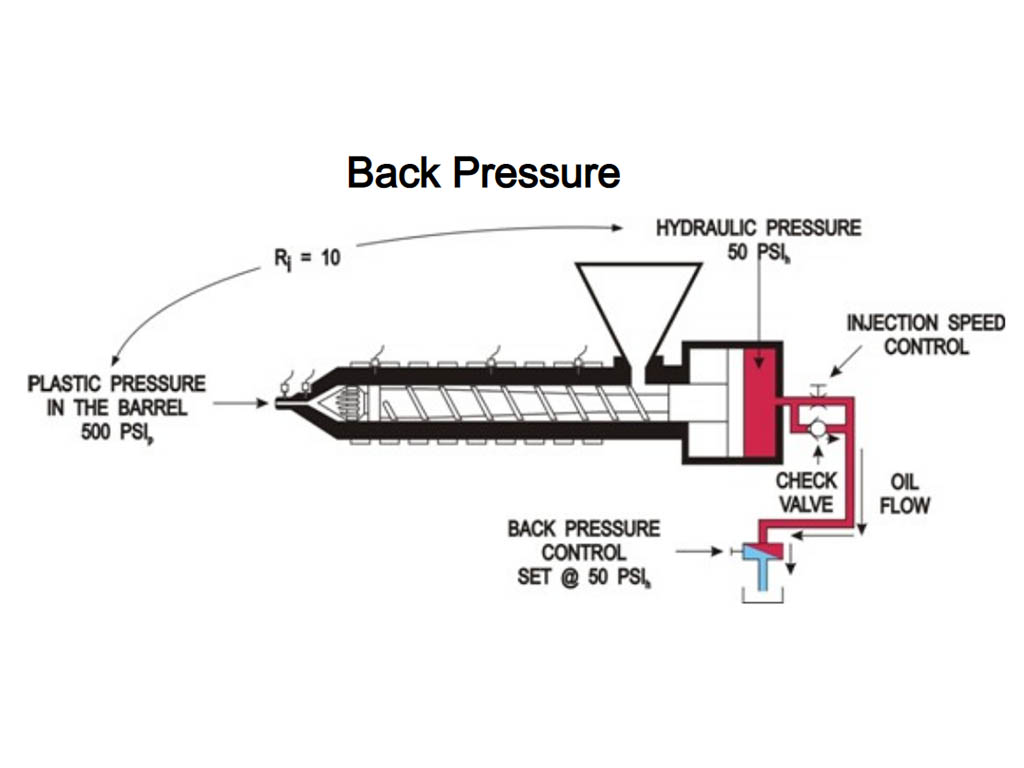
Back pressure is a crucial yet often overlooked parameter in injection molding. Properly setting back pressure improves shot-to-shot consistency and part quality.
In this comprehensive guide, as a professional plastic injection molding manufacturer, I will help you learn what back pressure is, why it’s important, and how to set it step-by-step.

What is Back Pressure Injection Molding?
Back pressure refers to the resistance against the screw as it recovers to build the next shot. It compresses the plastic in front of the non-return valve to ensure a consistent shot size and density.
Higher back pressure provides better melt uniformity and temperature control without raising the melt temp. It also improves color dispersion, venting, dimensional stability, and prevents screw augering.
However, excessive back pressure can damage reinforced resins and degrade temperature-sensitive plastics. It also increases cycle times.
Why is Setting Back Pressure Important?
Here are 5 reasons why properly setting back pressure matters:
1. Consistent Shot Size
Back pressure compression packs molecules tightly so every shot has the same density and weight. This consistency is vital for good parts.
2. Better Melt Quality
Increased back pressure blends additives and pigments more thoroughly without raising melt temp. This gives smooth, uniform melt.
3. Reduced Splay and Flash
By controlling shot density, back pressure prevents splay, flash, and other defects related to inconsistent fill.
4. Faster Color Changes
Back pressure clears the barrel more effectively during color changes by keeping the screw tip tight to the throat.
5. No Black Specks
It minimizes gaps between screw flights to prevent material degrading and causing black specks.
How Much Back Pressure is Needed?
As a rule of thumb, 50-100 psi of hydraulic back pressure per inch of screw diameter provides good results.
So a 3-inch screw needs 150-300 psi. Excessive back pressure risks damage, so increase cautiously in 50 psi increments until optimal.
Maintain the lowest possible back pressure that still delivers good parts. Every material and mold has unique requirements.
How to Set Back Pressure Injection Molding in 6 Steps
Follow this best-practice procedure to dial-in back pressure:
Step 1: Start With No Back Pressure
Set back pressure to zero and establish a base process. This is your reference point.
Step 2: Increase Screw RPM
Turn up screw rpm in 25-50 rpm increments until the process becomes inconsistent from too much shear heating. Then reduce rpm slightly until stable.
This finds the maximum rpm your configuration can handle. Now fix rpm and just adjust back pressure.
Step 3: Increase Back Pressure
Start by adding 50-100 psi of back pressure. Allow the machine to stabilize and watch for changes in consistency.
Step 4: Repeat Until Optimal
Keep incrementally increasing back pressure between shots in 50 psi steps. Continue up to the maximum back pressure recommended for the material or until you achieve the best consistency.
Step 5: Fine Tune the Setting
You may find the exact sweet spot lies between two back pressure settings. If so, choose the lower value for a bit more safety margin.
Step 6: Confirm with Data Monitoring
Finally, validate your new process with scientific molding data from the Critical Process Outputs (CPOs). The key metrics are shot weight/size and screw recovery time.
Carefully monitor variations shot-to-shot. If values deviate more than +/- 1% you likely need more back pressure for a truly repeatable process.
FAQs
Does Back Pressure Affect Melt Temperature?
No, back pressure has negligible influence on melt temp. Screw rpm is over 10 times more impactful.
Can You Calculate Back Pressure Required?
Not really. The optimal back pressure depends greatly on the material, colorant, mold design and other factors. It must be found experimentally.
Is There a Maximum Back Pressure Limit?
Yes, most experts suggest limiting back pressure to no more than 20% of the injection unit’s maximum tonnage. Excessive back pressure risks damage.
Why Does Increasing Back Pressure Increase Shot Size?
Greater back pressure packs molecules more densely. So for the same volume shot, more material is compressed into place, increasing the shot weight.
Conclusion
Setting appropriate back pressure is essential for robust, repeatable injection molding with consistent high-quality parts.
Follow these 6 steps starting from zero back pressure, initially maximizing screw rpm, then increasing back pressure in increments until optimal consistency is clinically determined.
Getting back pressure right the first time saves hours of debugging and frustrated customers later down the line. Take the time to dial it in precisely using scientific molding principles for a trouble-free process.
