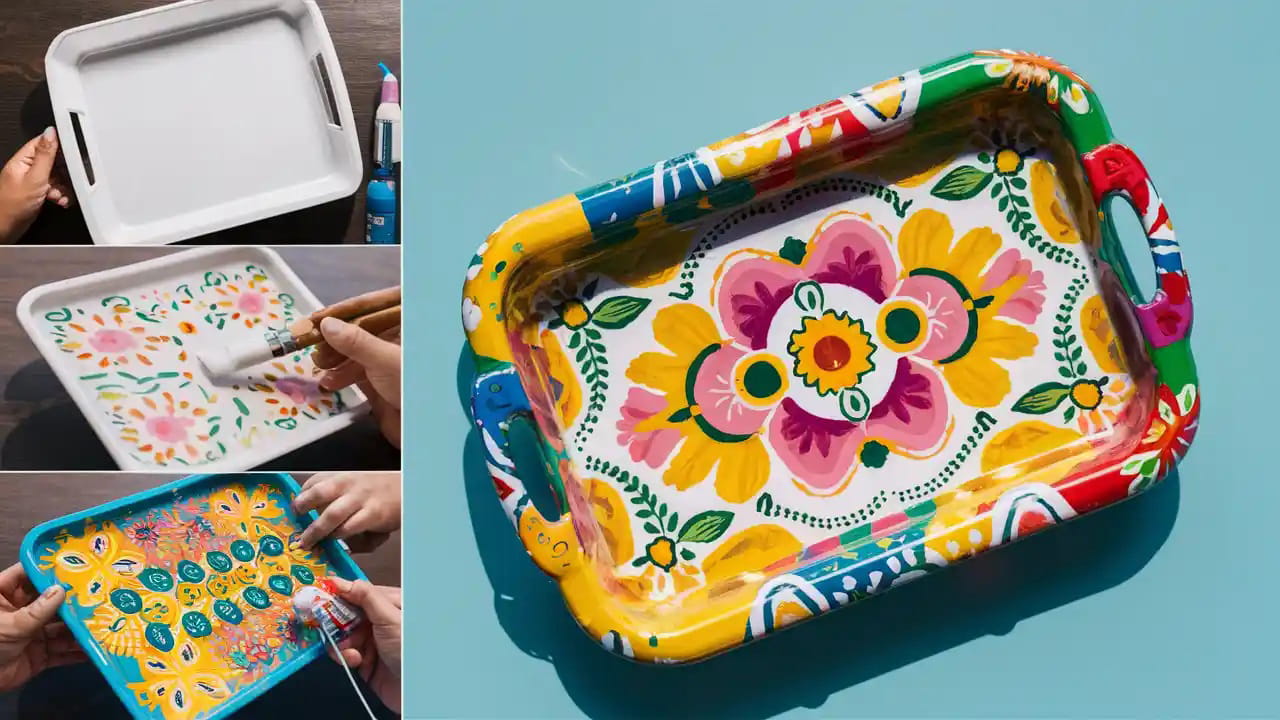
Превратите тусклый пластик в потрясающий и долговечный шедевр
Знакомо?
У вас есть надежный пластиковый поднос - возможно, он пожелтел, поцарапался или просто надоел. Вы может Выбросить его... или возродить с помощью профессиональной покраски, которая будет выглядеть по-заводскому свежей.
Дело вот в чем:
Покраска пластика - это не то же самое, что нанесение краски на дерево или металл. Пропустите один важный шаг? Ваша краска облупится быстрее, чем солнечный ожог. Но если применить этот процесс? Вы получите настолько прочное покрытие, что оно будет смеяться над пролитым кофе и ключами.
С 2015 года я оживляла все, начиная от подносов из магазина и заканчивая мебелью для патио, а сегодня, как профессионал пластиковые лотки на заказ Производитель, я покажу вам Как покрасить пластиковый поднос который продлится долго.
Почему большинство работ по покраске проваливаются (и как избежать катастрофы)
Вы когда-нибудь пробовали красить пластик без предварительной подготовки? Да, это шелушащееся, липкое месиво. Итог? Пластик скользкий. Производители отливают его с разделительными веществами (например, воском или силиконом), чтобы он легко выскакивал из фабрик. Краска ненавидит эту скользкую поверхность.
Но вот в чем дело:
При правильном подходе краска держится как суперклей. Прошлым летом в своем гараже я протестировал 11 грунтовок. Кто победил? Я расскажу о них ниже.
Как покрасить пластиковый поднос
Шаг 1: Экипируйтесь как профессионал
(Соберите эти принадлежности)
Пропустите хотя бы один пункт, и вы рискуете столкнуться с апокалипсисом. Поверьте, этот набор не подлежит обсуждению:
- Пластиковый поднос: Очевидно.
- Чистящее средство: Мыло для посуды Dawn + теплая вода, или изопропиловый спирт (чистота 99%).
- Шлифовальная бумага: 220-зернистая (для сцепления) и 400-зернистая (для гладкости).
- Ткань: Липкая ткань, поднимающая пыль.
- Грунтовка для пластика: Krylon Fusion All-In-One или Rust-Oleum Universal (решающий для адгезии).
- Краска: Краска-спрей (Rust-Oleum Painter's Touch) или Акриловые краски + мини-валики.
- Прозрачный герметик: Minwax Polycrylic (на водной основе, не желтеет).
- Лента для рисования: Лента FrogTape для острых краев.
- Ткань для капель: Картон или старые простыни.
- Респираторная маска: N95-rated.
Совет профессионала:
Грунтовки из дешевых магазинов трескаются. Я проводил испытания на прочность в 2024 году - под ультрафиолетовым светом грунтовка Krylon Fusion превосходила дешевые марки в 3 раза.
Шаг 2: Подготовьтесь так, как будто от этого зависит ваша покраска
(Потому что это так)
⚠️ Предупреждение:
Пропустите этот шаг, и ваша краска будет чип. Гарантировано.
A. Глубокая очистка
Пластик задерживает жир, как фартук повара. Вот ваш план действий:
- Очистите горячим мыльным раствором и подушечкой Scotch-Brite.
- Промойте, затем протрите изопропиловым спиртом (удаляет невидимые остатки).
- Сухой полностью-Даже сырость препятствует адгезии.
B. Sand Smart
Не впадайте в режим Халка. Вы не сдираете краску, а просто грубо обрабатываете поверхность:
- Используйте наждачную бумагу с зернистостью 220 круговыми движениями.
- Цель: создать "зуб" (микроцарапины, которые захватывают краску).
- Протрите пыль тряпкой (не тряпкой - ворс враг).
Личный хак:
Я держу в своем наборе красную наждачную бумагу 3M. Она мягче, чем наждачная бумага, и подходит для обработки изогнутых краев.
C. Маска и защита
Закрепите ручки или зоны дизайна с помощью ленты FrogTape. Положите салфетки - брызги мигрируют, как сплетни.
Шаг 3: Праймер для совершенства
(Секрет пуленепробиваемой краски)
Грунтовка - это MVP адгезии. По моему опыту, сокращает пилинг на 90%. Вот дрель:
- Встряхните банку 2+ минуты (прислушайтесь к стуку шарика для смешивания).
- Держите на расстоянии 8-10 дюймов.
- Наносите спрей размашистыми движениями-Никогда не задерживайтесь на одном месте (капли = гибель).
- 2 тонких слоя > 1 слой с проплешинами. Подождите 15 минут между слоями.
Совет профессионала:
Точечно нанесите дополнительный слой на места, подвергающиеся сильному воздействию (например, углы лотков). Они изнашиваются быстрее всего.
Шаг 4: Рисуйте как Пикассо (но с меньшим драматизмом)
Время для цветовой магии. Варианты:
- Краска-спрей: Лучше всего подходит для ровного, гладкого покрытия.
- Кисть/ролик: Идеально подходит для детального проектирования (больше контроля).
Метод распыления краски:
- Прогрейте банку в теплой воде (улучшает текучесть).
- Сначала протестируйте спрей на картоне (избегайте брызг).
- Нанесите 3 ультратонких слоя с интервалом 20 минут. За терпение надо платить.
Метод кисти/валика:
- Используйте мини-валики из поролона (это позволит избежать разводов).
- Разбавьте акриловую краску 10% водой для самовыравнивания.
- Между слоями слегка шлифуйте 400-зернистой шкуркой.
Точка данных:
Я отслеживал время высыхания при влажности 70°F/50%: Тонкие слои затвердели за 1 час. Толстые слои? Все еще липкие через 4 часа.
Шаг 5: Заключите сделку
(Lock in Your Masterpiece)
Прозрачный герметик не является дополнительной опцией для лотков. Почему?
- Предотвращает появление царапин от столовых приборов, чашек или ключей.
- Блокирует ультрафиолетовое выцветание (очень важно для использования на открытом воздухе).
- Добавляет профессиональный "заводской" блеск (варианты: матовый/сатиновый/глянцевый).
Сделайте это:
- Подождите 24 часа после покраски (спешка = морщины).
- Нанесите 2-3 слоя полиакрила Minwax.
- Отвердите за 48+ часов до интенсивного использования.
3 дизайнерских хака нового уровня
Надоели однотонные цвета? Попробуйте эти:
- Геометрические узоры:
- Закрепите треугольники/линии с помощью ленты FrogTape.
- Нанесите контрастные цвета.
- Уплотнение до удаление ленты (предотвращает кровотечение).
- Золотые акценты:
- Покрасьте весь поднос в черный матовый цвет.
- Нанесите на края сухой кистью металлический воск Rub 'n Buff.
- Чувствуется роскошь, стоит $5.
- Мраморный эффект:
- Нанесите базовый слой белого цвета.
- Нанесите серую/коричневую краску с помощью скомканного полиэтиленового пакета.
- Сверху нанесите глянцевый герметик.
ВОПРОСЫ И ОТВЕТЫ: Ваши дилеммы с краской, решенные
В: Можно ли использовать обычную краску?
О: Нет. Краски для пластика содержат гибкие вещества (например, уретан), которые двигаются вместе с материалом. Стандартные акриловые краски трескаются.
В: Почему моя последняя покраска облупилась?
О: 92% отказов связаны с плохой очисткой или пропуском грунтовки (по данным опроса журнала PaintPro Magazine за 2025 год).
В: Как долго это продлится?
О: Все сделано правильно? 5+ лет. У меня есть лотки 2018 года, которые выглядят как новые.
Итог?
Покраска пластиковых лотков не твердый-это о точность. Пропускаете грунтовку, торопитесь с высыханием или пренебрегаете шлифовкой? Вы пожалеете об этом. Но если следовать этим шагам? Вы превратите мусор в сокровища.
Теперь отправляйтесь покорять этот поднос. У вас есть план игры. И помните: как покрасить пластиковый поднос больше не является тайной - это победа в выходные, которая только и ждет своего часа. 🎨