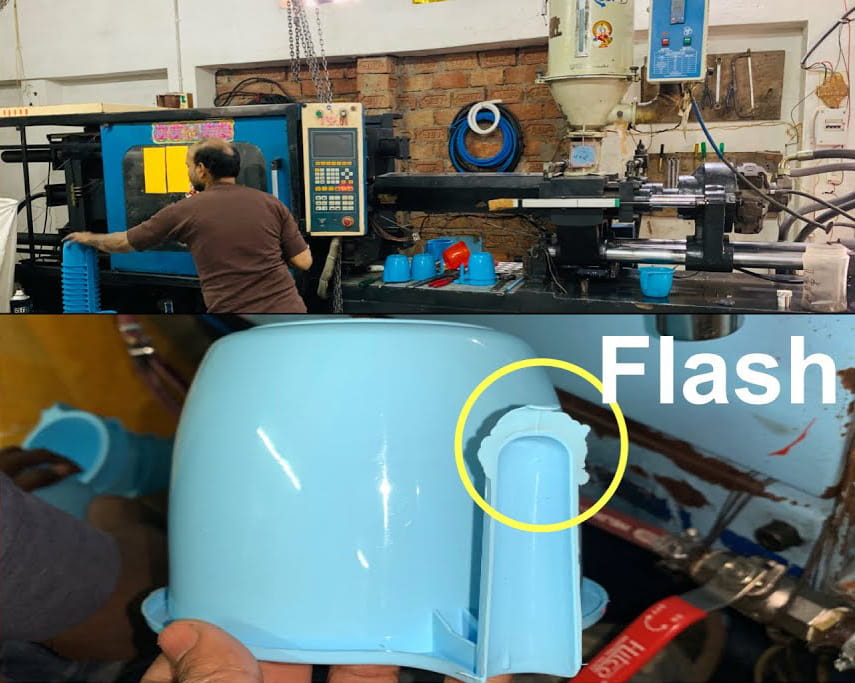
What is Flash in Injection Molding?
What is flash in injection molding? Well, flash refers to excess plastic that leaks out of the mold cavity during the injection molding process. It leaves thin “flaps” of plastic attached to the final part.
Although a small amount of flash is common, too much can negatively impact the appearance, texture, and assembly of injection molded components.
So in this complete guide, as a professional plastic injection molding manufacturer, I’ll cover everything you need to know about flash, including:
- Common causes of flash defects
- Solutions for minimizing flash
- Best practices for handling flash
Let’s dive in!

What Causes Flash in Injection Molding?
Flash happens when molten plastic escapes the mold cavity where the part is formed. There are a few common ways this can occur:
1. Parting Line Misalignment
The parting line is where the two halves of an injection mold meet. If there are gaps or misalignments along this line, plastic can leak through and cause flash.
Issues like worn mold tooling, debris buildup, and improper clamping force can all contribute to parting line leaks.
2. Insufficient Venting
Vents allow air to escape the mold cavity during filling. Without proper venting, air pockets get compressed and can force plastic through any tiny gaps in the tool.
3. Low Clamping Pressure
Clamping pressure keeps the mold securely closed against the high injection pressure. If it’s too low, the injection pressure can cause the mold to open slightly, allowing flash to form.
4. Unbalanced Flow
If the molten plastic doesn’t fill the mold cavity evenly, sections may solidify early while other areas are still filling. This can result in trapped air or the material “jetting” through the last opening, causing flash.
5. Low Viscosity Material
Low viscosity plastic materials flow more readily and can more easily escape through small parting line gaps or vents.
How to Minimize Flash
While some flash is often unavoidable, there are ways to reduce it through proper tooling design and optimized process settings:
✔ Precise Mold Alignment
Ensuring proper alignment and a tight seal along the parting lines is key. Any gaps should be identified and fixed.
✔ Adequate Venting
Add vents to release trapped air and balance cavity pressure during filling.
✔ Optimal Clamp Force
Clamping pressure should seal the mold without allowing the force to open gaps.
✔ Balanced Filling
Make sure plastic flows evenly into all areas of the cavity by adjusting injection speed, pressure, and temperature.
✔ Material Viscosity
Increase viscosity to prevent the material from seeping through small openings as readily.
Best Practices for Handling Flash
While minimizing flash through optimized tooling and processing is ideal, some excess plastic will likely remain. Here is how to properly handle flash:
✔ Locate Flash in Inconspicuous Areas
If flash is unavoidable, make sure the parting line and vents are placed where flash will have the least impact visually or functionally.
✔ Remove Flash Promptly
Use deflashing techniques like media blasting, cryogenic freezing, or manual trimming. Take care not to damage the part.
✔ Manage Flash Consistently
Make sure all parts are deflashed equally. Inconsistent flash removal can lead to variable part dimensions or aesthetics.
✔ Periodically Maintain Molds
Clean and inspect molds, restoring tight shut-offs and vent channels to reduce flash over time.
In Summary
So in summary, flash is excess material that escapes the cavity during injection molding, usually due to issues with mold alignment, venting, clamping, flow, or viscosity.
While completely eliminating flash is difficult without very expensive high-precision tooling, manufacturers can follow best practices around inspection, processing, and deflashing to keep flash controlled and make sure it has minimal impact on their injection molded components.
I hope this guide gives you a helpful overview of plastic injection molding flash – let me know in the comments if you have any other questions!
