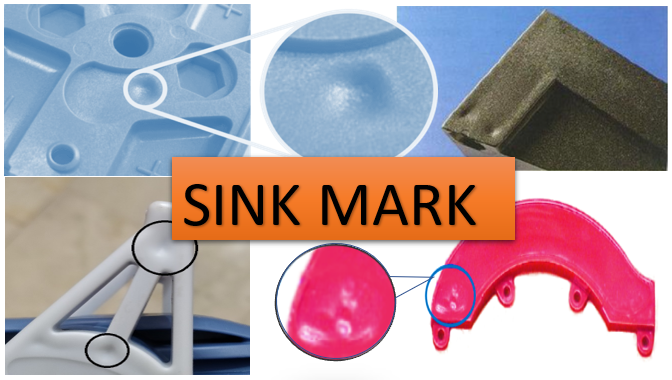
What is sink mark in injection molding? This common defect occurs as slight depressions on the surface of molded plastic parts. Sink marks usually form on thicker sections during the injection molding process.
While sink marks rarely affect strength or function, they can ruin the aesthetics of a part. For products where appearance is critical, like consumer electronics, sink marks are unacceptable.
In this complete guide, as a professional plastic injection molding manufacturer, we’ll cover what causes sink marks and how to prevent them through better part design and processing.

What is Sink Mark in Injection Molding?
Sink mark refers to a local depression on the surface of an injection molded plastic part. Sink marks typically occur on thicker sections of a component.
You usually find sink marks on areas like:
- The base of ribs
- Around bosses and inserts
- Where nominally thick walls transition to thin walls
Sink mark in injection molding looks like a shallow divot or dimple on the part surface. The defect reflects light differently than the surrounding area, making sink marks easy to spot.
Molded part with visible sink mark around boss
While a sink mark rarely impacts performance, it mars the appearance of a plastic part. Sink marks are common cosmetic defects in injection molding.
What Causes Sink Marks?
Sink marks stem from the injection molding process itself. Here’s a quick overview:
- Plastic pellets get melted into a liquid state and injected under pressure into a steel mold tool.
- The mold tool gives the liquid plastic the shape of the final part.
- After the cavity fills, the plastic cools until rigid enough to be ejected from the mold.
The natural shrinking of the cooling plastic can create sinks. If neighboring sections cool at significantly different rates, shrinkage also occurs unevenly.
Faster cooling on the surface causes the still-fluid inner material to “sink” away from the outer layer. The result is a visible depression on the surface once the plastic solidifies.
Common areas for uneven cooling are thick ribs, bosses, etc. The extra thickness means slower inner cooling compared to the surrounding plastic.
Thick features also shrink more due to greater volume. If adjacent thin sections “set” first, thick areas can pull away as they continue to shrink.
Why Do Sink Marks Matter in Injection Molding?
For most molders, sink marks matter because they indicate a cosmetic defect. Even tiny depressions reflect light differently across the part surface making sinks easy to see.
The visibility issue poses problems for plastic parts where aesthetics are paramount. Sink marks generally won’t impact performance but they do undermine product quality from a visual standpoint.
Examples where sink marks are unacceptable include:
- Consumer electronics
- Appliance panels
- Automotive trim
Pretty much any injection molded part where appearance affects perceived quality or brand image.
In these cases, avoiding sink marks matters – even tiny ones.
For other applications like industrial parts or medical components, slight sinks only matter if they reveal an underlying performance issue. But cosmetic defects usually go unnoticed if the part functions properly.
How to Prevent Sink Marks
Now that we know why sink marks occur and where they happen, how can we prevent them?
Here are five common ways injection molders reduce or eliminate sink marks:
Tip #1: Optimize Pack & Hold
Pack & hold refers to the injection molding phases after the cavity fills.
First packing pressure gets applied to pack additional plastic into the tool. This helps accommodate shrinkage as the part cools.
The pack phase transitions into the hold phase where pressure holds for a set time to allow thicker areas to solidify.
Insufficient packing and hold can definitely cause sinks. But excessive packing also over-stresses the part which leads to warpage issues.
Careful pressure adjustment combined with enough hold time works best to avoid sink marks.
Tip #2: Increase Gate Size
The gate is the opening in the injection mold where plastic enters the tool.
A bigger gate can reduce sinks by allowing faster cavity filling and better packing. But it also usually leads to more visible gate blushing on the part surface.
There are always tradeoffs!
Tip #3: Add Venting
Trapped air causes problems in the mold cavity. As the plastic fills, it compresses gas in the cavity.
This trapped gas wants to escape through the path of least resistance – often the hot plastic. The result can be burn marks, voids, and sinks.
By adding vents to the tool, excess gas can escape the cavity rather than getting forced into the hot plastic. Proper venting prevents air bubbles and sinks.
Tip #4: Lower Melt & Mold Temps
To produce quality parts, technicians need to inject the plastic at the proper melt temperature. But excessive melt temps mean slower cooling in the mold.
This effect gets amplified with overheated mold surfaces. Hot molds keep the plastic fluid longer, increasing shrink variation.
Carefully monitoring and reducing melt and mold temperatures help avoid sinks by enabling uniform cooling.
Tip #5: Modify Part Design
Changing the part geometry provides the most permanent sink mark solution.
Common fixes involve adding ribs, reducing wall thickness, or modifying problematic features like bosses.
Ribs add strength to enable adjacent wall thinning. Core out heavy sections to promote even cooling. Anything to reduce drastic thickness changes that cause uneven shrinkage.
Part drawings should get checked by an experienced molder during the design phase. They can identify problem areas and suggest changes before tooling ever gets built.
Conclusion
Sink marks happen as a natural result of the injection molding process. But understanding what causes uneven cooling and shrinkage puts engineers on the path to solutions.
Armed with that insight, tweaks to tooling, molds, and even part designs can significantly reduce sink defects on plastic parts for all types of applications.
