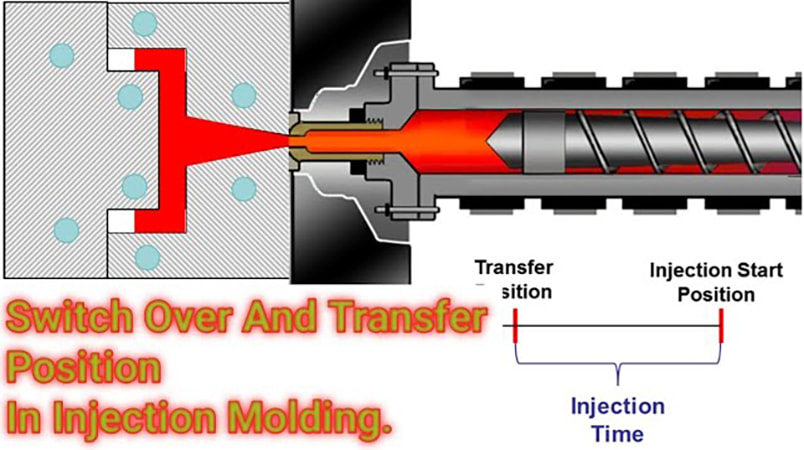
Transfer position is one of the most crucial yet often overlooked aspects of the injection molding process. As a professional plastic injection molding manufacturer, I want to lift the veil on this key technique and explain precisely what the transfer position is and why it matters so much.

What is Transfer Position in Injection Molding?
In essence, the transfer position in injection molding refers to the exact moment when the injection molding machine switches from the filling phase to the packing phase. This transition occurs when the mold cavities are around 95% to 99% filled, allowing the remaining space to get packed out under lower pressure.
Getting this transfer position right is vital for producing high-quality, dimensionally consistent parts batch after batch. Mess it up, and you’ll end up with defects like sink marks, voids, and warpage. Let’s dig into the specifics…
Why Transfer Position Matters
As a quick refresher, injection molding involves these key phases:
- Clamping – The mold closes and applies clamping force
- Filling – Molten plastic fills the mold cavities
- Packing – Additional pressure packs out the part
- Cooling – The mold absorbs heat so the part can solidify
The transfer position marks the switchover from filling to packing. Here’s why it’s so important:
During filling, plastic flows into the mold at high speed. This high injection velocity keeps the material thermally homogeneous and discourages early freezing.
However, high velocities also encourage molecular orientation within the polymer flow, especially along the flow path edges. This orientation can lead to visible flow lines, localized shrinkage, and uneven properties in the final part.
The purpose of packing is to suppress this orientation by applying a prolonged holding pressure at the end of filling. This extra pressure at the end “packs out” the part and discourages molecules from snapping back to uneven configurations.
So in summary – the transfer position controls exactly when velocity gives way to pressure, balancing complete mold filling with suppression of molecular orientation effects.
Botch the transfer, and you get the worst of both worlds – partially oriented, incomplete mold filling. Nail it, and you get beautifully homogenous parts that match CAD dimensions and avoid costly quality issues.
How Transfer Position is Detected
Older injection molding machines use screw position as a proxy for transfer position. By setting a screw travel distance that corresponds to 95-99% mold filling, the machine switches from velocity to pressure control once this position is reached.
However, screw position shows what’s happening in the barrel, not inside the mold itself. Newer machines can directly monitor cavity filling using cavity pressure transducers:
- Pressure transducers mounted inside the mold
- Detect sudden pressure increases as filling finishes
- Signal transfer position precisely when required
Direct cavity monitoring gives far tighter process control and part consistency. It also allows true closed loop control by feeding pressure data back to the machine controller on every cycle.
Other intermediate options include switching based on injection pressure thresholds or fixed fill time. But cavity pressure is the gold standard for precision processing.
Dialling in Transfer Position
Nailing down the optimum transfer position takes testing, fine-tuning, and analysis. Here’s my 3-step process for dialling it in precisely:
Step #1: Baseline with Production Settings
Start by gathering baseline data using existing production parameters:
- Injection profile (speeds, transitions)
- Transfer position method
- Transfer pressure/distance/time
- Hold pressure and time
With basics set, put the mold through its paces producing sample parts. Measure key dimensions and inspect for defects.
Step #2: Optimise Transfer Timing
Now it’s time for tweaking.
If large variations exist in critical dimensions like wall thickness, adjust transfer timing and pressure settings over multiple cycles:
- Does transferring earlier/later improve consistency?
- What pressure levels eliminate visible defects?
Be methodical and record all settings changes and measurement data. Over multiple iterations, hone in on timing and pressure combinations that maximise part uniformity.
Step #3: Confirm Optimised Settings
Validate your new optimized configuration by producing a significant batch of parts:
- Inspect dimensions across the entire sample
- Check for visible defects on every part
- Ensure mechanical performance matches requirements
If testing confirms improved consistency and quality, roll out the revised settings into general production. But if issues remain, it’s back to the tweaking board!
In Closing
Dialing in that perfect transfer position might take some work up front. But taking the time to optimize this vital transition pays off tenfold in part quality, consistency, and capability over the production lifetime.
Whether you utilize screw position, cavity transducers, pressure, or timed control, focusing on finessing the transfer will dramatically level-up your injection molding process. The result? Sky high part quality and next to zero rejects.
What say you, friend… are you ready to transform your transfer technique? Hit me up with any transfer tips or questions in the comments! I’m always down to nerd out about injection molding.
